
Temenos Lifecycle Management Suite - Collection Product Guide
Security Groups
| Administrator Guide > Security and Permissions > Security Groups |
Security Groups are designed so that managers can set Temenos Lifecycle Management Suite access for an entire group. Rather than going through the process of assigning individual user permissions and access to features for every employee, administrators can assign permissions to Security Groups to provide access to all Lifecycle Management Suite features that can be set at the individual user level.
Security Groups can be created and managed from System Management > Groups > Security Groups.

The Security Groups page displays the following columns of information about each Security Group:
| Column Name | Description |
| Name | The name of the Security Group. |
| Description | The description of the Security Group. |
| Last Modified | Denotes when the last modification to the Security Group was made. |
| Modified By | Denotes who made the last modification to the Security Group. |
All security groups have common attributes that are defined while creating, copying, or editing a security group.
The General attributes include the basic information about the security group.
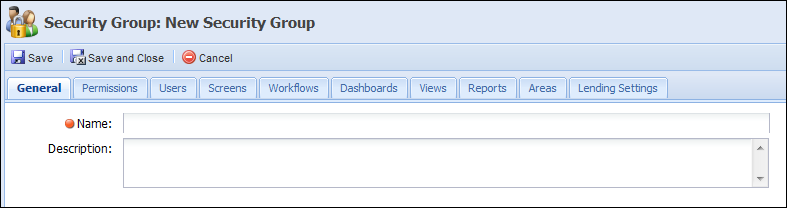
The following General security group attributes are defined in the General tab:
| Attribute | Description |
| Name | Provide a name for the Security Group. This is a required field. |
| Description | Provide details about the Security Group. |
Use the Permission attribute, located in the Permissions tab, to manage the new Security Group’s access to several features throughout the Lifecycle Management Suite. This tab contains 2 columns: Function and Permission. Click under the Permission column in the corresponding row of the screen and a drop-down appears. Change the value in this drop-down to assign the security group access to the function. The following permission options are available within the permission drop-down:
 |
If an individual user permission is set to “None” but the user is a part of a Security Group that has “Change” permission to the same feature, the system defaults to “Change.” The higher permission between the user and group level is systematically set. |
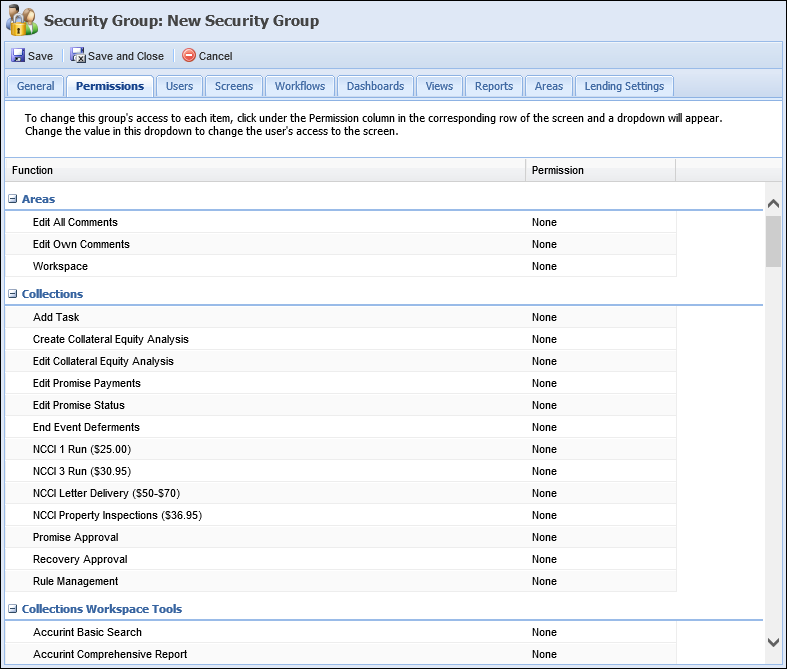
Below is a list of the permissions that can be customized by the administrator and their description:
Below is a list of all the permissions that can be customized by the administrator and their description.
| Areas | |
| Name of Permission | Description |
|
Edit All Comments:
Allows a user to edit all comments made by other users within the Workflow History screen. |
None = Users are not able to edit other user’s comments in Workflow History Screens. Change = Allows users to edit any other user’s comments in Workflow History screens. |
|
Edit Own Comments:
Allows a user to edit only comments made by the same user within the Workflow History screen. |
None = Users are not able to edit their own comments in Workflow History screens. Change = Allows users to edit their own comments in Workflow History screens. |
| Collections | |||||||
| Name of Permission | Description | ||||||
|
Add Task:
Allows a user to add tasks when working a case. |
None = Users cannot add tasks when working a case.
Change = When working a case, allows users to Add a Task. |
||||||
|
Add Cash Flow:
Allows a user to add a cash flow, and make a transaction. |
None = Users cannot add a cash flow to an account.
Change = Users are able to add a cash flow to an account. |
||||||
|
Calculate Cash Flow Payments:
Allows users to calculate payments when adding a cash flow, or editing a cash flow. |
None = Users cannot calculate an account's cash flow.
Change = Users are able to calculate payments when adding, or editing a cash flow. |
||||||
|
Case Processes:
Allows a user to view, edit, delete and create changes to case processes within System Management. Changes made in System Management are reflected when working a case in the workspace. |
None = Users can not view or access the Case Processes page in System Management > Collections > Case Processes.
View = Allows users to view but not make any changes to the Case Processes page in System Management > Collections > Case Processes. Change = Allows users to view and make changes within the Case Processes page in System Management > Collections > Case Processes. |
||||||
|
Case Queues:
Allows a user to view, edit, delete, and create changes to case queues within System Management. Changes made in System Management are reflected when working a case in the workspace. |
None = Users can not view or access the Case Queues page in System Management > Collections > Case Queues.
View = Allows users to view but not make any changes to the Case Queues page in System Management > Collections > Case Queues. Change = Allows users to view and make changes within the Task Queues page in System Management > Collections > Case Queues. |
||||||
|
Case Tasks:
Allows a user to view and make changes to Task Processes and Task Templates within System Management. Changes made in System Management are reflected when working a case in the workspace. |
None = Users can not view or access Task Processes or Task Templates in the Tasks folder in System Management.
View = Allows users to view but not make any changes to any of the Task Processes and Task Templates in the Tasks folder in System Management. Change = Allows users to view and make changes to Task Processes and Task Templates in the Tasks Folder in System Management. |
||||||
|
Case Types:
Allows a user to view and make changes to various case types that are reflected in the workspace. |
None = Users can not view or access the Case Types page in System Management.
View = Allows users to view but not make any changes to the Case Types page in System Management. Change = Allows users to view and make changes within the Case Types page in System Management. |
||||||
|
Collection Queues:
Allows a user to view and make changes to Collection queues that are reflected in the workspace. Collection queues include features such as Collection Queue Refresh Order and Collection Queue Work Order. |
None = Users can not view or access the Collection Queues, Collection Queue Refresh Order, and Collection Queue Work Order pages in System Management > Collections.
View = Allows users to view but not make any changes to the Collection Queues, Collection Queue Refresh Order, and Collection Queue Work Order pages in System Management > Collections. Change = Allows users to view and make changes within the Collection Queues, Collection Queue Refresh Order, and Collection Queue Work Order pages in System Management > Collections. |
||||||
|
Create Collateral Equity Analysis:
Allows a user to create Equity Analysis on a collateral screen within a person workspace. |
None = Users cannot create an Equity Analysis within a person's collateral screen.
Change = Allows users to create an Equity Analysis from within a person's collateral screen. |
||||||
|
Edit Cash Flow:
Allows a user to perform transactions and update cash flow fields, but not calculate payments. |
None = Users can not view or update the details of a cash flow.
View = Allows users to view, but not make any changes to the details of a cash flow. Change = Allows users to view and make changes to the details of a cash flow. |
||||||
|
Edit Collateral Equity Analysis:
Allows a user to edit existing equity analysis located on a person's collateral screen in the workspace. |
None = Users cannot edit an existing Equity Analysis from within a person's collateral screen.
Change = Allows users to edit an existing Equity Analysis from within a person's collateral screen. |
||||||
|
Edit Expenses:
Allows a user to add and edit expenses within the Expenses - Account screen in the workspace.
|
None = Users cannot add or edit expenses within the Expenses - Account screen. When the screen opens in the workspace, the toolbar is not available, and the screen displays as read-only.
Change = Allows users to add and edit expenses within the Expenses - Account screen. |
||||||
|
Edit Letters:
Allows a user to edit the letters assigned to a Send Letter Workflow step. |
None = Users are unable to edit letters in the Send Letter workflow step. When View/Print is clicked in the workflow step, the letter opens in a PDF document, which does not permit changes.
Change = Allows users to modify letters in the Send Letter workflow step. When View/Print is clicked in the workflow step, the letter opens in an editable Word document. |
||||||
|
Edit Promise Payments:
Allows a user edit existing promise payments made within the person workspace. |
None = Users cannot edit promise payment arrangements, or cancel promises in the Promises screen. Change = Allows users to edit promise payment arrangements, and cancel existing promises in the Promises screen. |
||||||
|
Edit Promise Status:
Allows a user to edit the promise status of an existing promise made in the person workspace. |
None = Users cannot edit promise statuses in the Promises screen.
Change = Allows users to edit promise statuses in the Promises screen.
|
||||||
|
End Exclusive Rule Authoring Session:
Allows a user to end an exclusive Rule Authoring session in System Management > Collections > Rules Management. |
None = User is not able to end the exclusive rule authoring session of another user in Rules Management. The End Session button is disabled within the Rule Sessions tab.
Change = User is able to end the exclusive rule authoring session of another user in Rules Management. The End Session button is enabled within the Rule Sessions tab. |
||||||
|
Event Processing:
Allows a user to create and maintain event and action pairings. |
None = Event Processing screen within System Management is not available to user.
View = Event Processing screen within System Management can be viewed but not edited by user. Change = Event Processing screen within System Management screen can be viewed and edited by user. |
||||||
|
Phone Number Classification:
Allows a user to enable and configure Phone Number Classification within System Management. |
None = Users do not have access to the Phone Number Classification page in System Management.
Change = Users have access to and can configure Phone Number Classification within System Management. |
||||||
|
Profile Import:
Allows a user to access and change various profile import settings in System Management > Collection > Profile Import
|
None = Users do not have access to the Profile Import page in System Management.
View = Users have access to the Profile Import page in System Management, but are not able to make any changes to the configurations. Change = Users are able to both access the Profile Import page in System Management and update the configurations. |
||||||
|
Promise Approval:
Allows a user to access and change various promises awaiting approval. |
None = Users do not have access to the Promise Approval page in System Management and are not able to respond to promises pending approval. Change = Allows users access to the Promise Approval page in System Management and they are able to respond to promises pending approval. |
||||||
|
Recovery Approval:
Allows a user to view and process pending charge offs within System Management.
|
None = Users do not have access to the Recovery Approval page in System Management and are not able to respond to charge-offs pending approval.
View = Users have access to the Recovery Approval page in System Management but are not able to accept and/or reject charge-offs. Change = Users are able to both access the Recovery Approval page in System Management and process pending charge-offs. |
||||||
|
Rules Management:
Allows a user to access the Rules Management application. The Rules Management application allows users with proper permissions to view and create rules to apply in various contexts throughout the system. |
None = Users do not have access to the Rule Management page in System Management > Collections, and do not have the ability to view/open the rules manager in various other areas in the system that utilize the rules integration. Change = Allows users access to the Rules Management application throughout the system. |
||||||
|
View Masked Fields:
Allows a user to view the value of masked fields in the workspace.
|
None = User is unable to view the value of masked fields in the workspace. When the user hovers over the
View = User is able to view the value of masked fields in the workspace. Clicking the
|
||||||
|
Workspace:
Allows a user to perform various functions within the person workspace, such as writing comments or working a queue, as well as grants the user permission to use the Search feature within the Ribbon Bar. |
None = Users are not able to perform various functions within the workspace, such as posting a comment, or working a queue, and can not access workspaces from the Queues, Views, and/or Dashboards page. When set to None, the user is also unable to use the Search feature; therefore, the
View = Allows users to view comments and queues in the workspace, but not work queues. When set to View, users are able to access workspaces from the Queues, Views, and/or Dashboards page, and use the Search feature; however, only screens and workflows that the user is assigned permission to are available in the Left Navigation Panel, and no changes can be made to any screens and/or workflows in the workspace. Change = Allows users to perform various functions in the workspace, such as posting a comment, and working queues. When set to Change, users can access workspaces using the Search feature, as well as from the Queues, Views, and/or Dashboards page, and are able to perform all functions for the selected account or person in the workspace.
|
||||||
| Desktop | |
| Name of Permission | Description |
|
Create Account:
Allows users to create a person account from the Ribbon Bar. |
None = Users are not able to access the create accounts drop down option or create accounts from the Ribbon Bar. Change = Allows users to create accounts from the Create Accounts dropdown in the Ribbon Bar. |
|
Create Case:
Allows a user to view and create cases while working a person workspace. |
None = Users are not able to see or create cases using the “briefcase” icon in the workspace toolbar.
Change = Allows users to create cases using the “briefcase” icon in the workspace toolbar. |
|
Create Person: Allows a user to create a person from the Ribbon Bar. |
None = Users are not able to see the "Create Person" menu option.
Change = Allows users to create persons using the Create drop-down in the Ribbon Bar. |
|
Dashboards:
Allows a user to view and change Dashboards from the Ribbon Bar. Dashboards are groups of different Web Parts in the system. Web Parts are predefined information boxes that display information about queues, user performance and applications. Views and reports can also be added to dashboards. |
None = Users have limited to no access to the Dashboards page in the Ribbon Bar, depending on their assigned dashboards. If no dashboards are assigned to the user or security group, the Dashboards icon is not displayed in the Ribbon Bar. If the user or security group is assigned one or more dashboards, the Dashboards icon appears in the Ribbon Bar, but the Dashboards page opens in view mode.
View = Allows users to view the Dashboards list in the Dashboards page, but not run dashboards. Change = Allows users to view the list of dashboards, and run dashboards from the Dashboards page . |
|
Reports:
Allows a user to view and create an unlimited amount of reports from the Ribbon Bar. Reports can be run on-demand by anyone who has permission to run the report or can be scheduled to run at certain times. |
None = Users have limited to no access to the Reports page in the Ribbon Bar, depending on their assigned reports. If no reports are assigned to the user or security group, the Reports icon is not displayed in the Ribbon Bar. If the user or security group is assigned one or more reports, the Reports icon appears in the Ribbon Bar, but the Reports page opens in view mode.
View = Allows users to view the Reports list in the Reports page, but not run, see history or design any reports. Change = Allows users to view the list of reports, run reports, see history, and design reports from the Reports page. |
|
Run Non-Person Workflow:
Allows a user to view and run non-person workflows within the Ribbon Bar. |
None = Users do not have access to the Non-Person workflow option in the Ribbon Bar. Change = Allows users to run non-person workflows from the Create drop-down in the Ribbon Bar. |
|
View Full TIN in Search Results:
Allows the full TIN to show when searching an account, not just the last four digits. |
None = Allows users to only view the last 4 digits of a TIN when using the search function. View = Allows users to view the entire TIN when using the Search function. |
| View System Exceptions: Allows a user to view the all of the error exception details and the error description in the Event Log. |
None = Users are unable to access the error exception details and error description in the Event Log. View = Users are able to access the error exception details and error description in the Event Log. |
|
Views:
Allows a user to view and change Views from the Ribbon Bar. Views are interactive reports that can be run any time by anyone who has permissions to run the view. |
None = Users have limited to no access to the Views page in the Ribbon Bar, depending on their assigned views. If no views are assigned to the user or security group, the Views icon is not displayed in the Ribbon Bar. If the user or security group is assigned one or more views, the Views icon appears in the Ribbon Bar, but the Views page opens in view mode.
View = Allows users to view the Views list in the Views page, but not run views. Change = Allows users to view the list of views, and run views from the Views page. |
| Loan Modifications | |
| Name of Permission | Description |
|
Create Loan Modification: Allows a user create a loan modification from the Loan Modification History screen in the workspace. Creating a loan modification allows a user to edit any loan specifications relevant to the loan. |
None = Create button is disabled on the Loan Modification History screen. Change = Create button is enabled on the Loan Modification History screen. |
|
Delete Loan Modification:
Allows a user to delete any existing loan modifications. |
None = Delete button is disabled on the Loan Modification History screen.
Change = Delete button is enabled on the Loan Modification History screen. |
|
Edit Loan Modification:
Allows a user to edit any existing loan modifications. |
None = Edit button is disabled on the Loan Modification History screen. Change = Edit button is enabled on the Loan Modification History screen. |
|
Process Loan Modification:
Allows a user to process and approve any loan modifications created for a loan. |
None = Process button is disabled on the Loan Modification History screen. Change = Process button is enabled on the Loan Modification History screen. |
| Modules | |
| Name of Permission | Description |
|
COLLECTION:
Allows a user to view and change settings within the Collection page in System Management. Any changes made within the Collection page apply to all of the Collection module in the Lifecycle Management Suite. |
None = Users cannot view or access collection settings in System Management > Modules > Collection.
View = Allows users to view collection settings, but not make any changes to the settings in System Management > Modules > Collection. Change = Allows users to view and make changes to collection settings in System Management > Modules > Collection. |
| System Management | |
| Name of Permission | Description |
|
Account Assignments:
Allows a user to manually assign or unassign accounts to a Collection Queue. |
None = Users can not view or access the Account Assignments page in System Management. View = Allows users to view but not make any changes to the Account Assignments page in System Management. Change = Allows users to view and make changes within the Account Assignments page in System Management. |
|
Account Types:
Allows a user to view and change Account Types for collections. These Account Types can be mapped to various accounts within the Lifecycle Management Suite. |
None = Users can not view or access the Account Types page in System Management.
View = Allows users to view but not make any changes to the Account Types page in System Management. Change = Allows users to view and make changes within the Account Types page in System Management. |
|
Administrative Settings:
Allows a user to view and change administrative settings within the Lifecycle Management Suite. Administrative Settings can be accessed in System Management and include settings such as look and feel, security and institutional information. |
None = Users can not view or access the Administrative Settings page in System Management.
View = Allows users to view but not make any changes to the Administrative Settings page in System Management. Change = Allows users to view and make changes within the Administrative Settings page in System Management. |
|
Alerts:
Allows a user to view and edit system-wide alerts that appear each time a user logs into the system. |
None = Users can not view or access the Alerts page in System Management.
View = Allows users to view but not make any changes to the Alerts page in System Management. Change = Allows users to view and make changes within the Alerts page in System Management. |
|
Archive Data:
Allows a user to archive data, such as accounts, within the Lifecycle Management Suite. Archiving data cannot be undone. Therefore, users should be cautious with using this functionality. |
None = Users can not view or access the Archive Data page in System Management. Change = Users can view and access the Archive Data page, as well as perform the Archive function. |
|
Areas:
Allows a user to access and change Lifecycle Management Suite Areas from System Management. Areas allow users to configure the look and feel and functionality of a workspace. |
None = Users can not view or access the Areas page in System Management.
View = Allows users to view but not make any changes to the Areas page in System Management. Change = Allows users to view and make changes within the Areas page in System Management. |
|
Automated Workflow:
Allows a user to view and create automated workflows within the Lifecycle Management Suite. |
None = Users can not view or access the Automated Workflow page in System Management > Workflow > Automated Workflow.
View = Allows users to view but not make any changes or execute Automated Workflows within the Automated Workflow page in System Management > Workflow > Automated Workflow. Change = Allows users to view and make changes within the Areas page in System Management. |
|
Batch Case Processing:
Allows a user to view and perform Batch Case Processing within the Lifecycle Management Suite. |
None = Users can not view, access, or perform the Batch Case Processing function within System Management > Batch Case Processing. Change = Allows users to view, access, and perform the Batch Case processing function within System Management > Batch Case Processing. |
|
Batch Letter Printing:
Allows a user to view and perform Batch Letter Printing for a previously created batch. |
None = Users can not view, access, or perform the Batch Letter Printing function within System Management > Communication > Batch Letter Printing. Change = Allows users to view, access, and perform the Batch Letter Printing function within System Management > Communication > Batch Letter Printing. |
|
Batch Workflow:
Allows a user to create and execute batch workflows within the Lifecycle Management Suite. Batch Workflow allows administrators to apply a single workflow to multiple accounts at one time based on the Account Identifier, rather than retrieving each account separately and manually applying the workflow multiple times. |
None = Users can not view, access, or perform the Batch Workflow function within System Management > Workflow > Batch Workflow.
View = Allows user to view and access the Batch Workflow page but not execute a Batch Workflow in System Management > Workflow > Batch Workflow. Change = Allows users to view, access, and execute Batch Workflows within System Management > Workflow > Batch Workflow. |
|
Branches:
Allows a user to create and maintain branches in the Lifecycle Management Suite. |
None = Users cannot view or access the Branches page in System Management.
View = Allows users to view but not make any changes to the Branches page in System Management. Change = Allows users to view and make changes within the Branches page in System Management. |
|
Categories:
Categories are no longer used in v14. |
None = Users can not view or access the Categories page in System Management.
View = Allows users to view but not make any changes to the Categories page in System Management. Change = Allows users to view and make changes within the Categories page in System Management. |
|
Companies and Contacts:
Allows a user to view, edit and change companies and contacts within the Address Book. These companies and contacts can be accessed throughout the Lifecycle Management Suite. |
None = Users can not view or access the Companies and Contacts pages in System Management > Address Book.
View = Allows users to view but not make any changes to the Companies and Contacts pages in System Management > Address Book. Change = Allows users to view and make changes within the Companies and Contacts pages in System Management > Address Book. |
|
Configuration Export:
Allows a user to view, edit and change Configuration Manager Exports. |
None = Users can not view or access the Export Configurations page in System Management > Configurations.
Change = Allows users to view and make changes within the Export Configurations page in System Management > Configurations. |
|
Configuration Import:
Allows a user to view, edit and change Configuration Manager Imports. |
None = Users can not view or access the Import Configurations page in System Management > Configurations.
Change = Allows users to view and make changes within the Import Configurations page in System Management > Configurations. |
|
Connectors:
Allows a user to access connectors that the institution utilizes within System Management. |
None = Users do not have access to the Connectors folder in System Management.
View = Allows users to access the connector pages but not save any changes within the page. Change = Allows users to have access to all Connectors in the Connectors folder in System Management. |
|
Cost Centers (Recovery Module):
Allows a user to view and change costs centers within the system. Cost Centers provide a way to break expenses down by department to use the information for reporting. When creating an Expense or Other Cost/Fee transaction on a charged off account, a cost center can be selected to associate with the transaction. |
None = Users can not view or access the Cost Centers page in System Management.
View = Allows users to view but not make any changes to the Cost Centers page in System Management. Change = Allows users to view and make changes within the Cost Centers page in System Management. |
|
Custom Field Management:
Allows a user to create custom fields that are used to extend the Lifecycle Management Suite database. Custom fields can be used throughout the entire system. |
None = Users can not view or access the Custom Fields page in System Management.
View = Allows users to view but not make any changes to the Custom Fields page in System Management. Change = Allows users to view and make changes within the Custom Fields page in System Management. |
| Data Purging Allows a user to view and change the data purge settings for Lifecycle Management Suite database tables. |
None = Users can not view or access the Data Purging page in System Management > Data Purging.
View = Allows users to view, but not make any changes to the Data Purging page in System Management > Data Purging. Change = Allows users to view and make changes within the Data Purging page in System Management > Data Purging. |
|
Dialer Return Codes:
Allows a user to view and change dialers used when the system performs actions based off the code. When an institution is using a dialer, the dialer returns a code to the system after each call. |
None = Users can not view or access the Dialer Return Codes page in System Management > Dialers > Dialer Return codes.
View = Allows users to view but not make any changes to the Dialer Return Codes page in System Management > Dialers > Dialer Return Codes. Change = Allows users to view and make changes within the Dialer Return Codes page in System Management > Dialers > Dialer Return Codes. |
|
Emails:
Allows a user to view and create email templates to be used while working a case. |
None = Users can not view or access the Emails page in System Management > Communication > Emails.
View = Allows users to view but not make any changes to the Emails page in System Management > Communication > Emails. Change = Allows users to view and make changes within the Emails page in System Management > Communication > Emails. |
|
Exports:
Allows a user to view and change export settings within System Management. |
None = Users cannot view or access the Exports page in System Management.
View = Allows users to view but not make any changes to the Exports page in System Management. Change = Allows users to view and make changes within the Exports page in System Management. |
|
Field Configurations:
Allows a user to view and change field configurations within the Lifecycle Management Suite . Changes made in field configurations apply throughout the entire system. |
None = Users cannot view or access the Field Configurations page in System Management..
View = Allows users to view but not make any changes to the Field Configurations page in System Management. Change = Allows users to view and make changes within the Field Configurations page in System Management. |
|
Field List Configurations:
Allows a user to map values from the BANKRUPTCY_PARTY_TYPE and PARTY_TYPE lookups to up to 10 flattened Bankruptcy Party or Legal Party fields, in order to populate the data in letters, views, and/or reports.
|
None = Users cannot view or access the Field List Configurations page in System Management..
View = Allows users to view the Field List Configurations page in System Management, but not make any changes. Change = Allows users to view and make changes within the Field List Configurations page in System Management. |
|
Genesys:
Allows a user to access the Genesys application, if available for the institution. Genesys provides dialer services. |
None = Users can not access the Genesys page. Change = Allows users to have access to the Genesys application. |
|
GL Accounts (Recovery Module):
Allows a user to view and change GL Accounts when using the Recovery Module. GL Accounts are used when defining the posting rules on a transaction code to determine how a new transaction is allocated on a recovery account. |
None = Users can not view or access the GL Accounts page in System Management.
View = Allows users to view but not make any changes to the GL Accounts page in System Management. Change = Allows users to view and make changes within the GL Accounts page in System Management. |
|
Hyperlinks:
Allows a user to view and change Hyperlinks in System Management. Hyperlinks can be used when working a case.
|
None = Users can not view or access the Hyperlinks page in System Management.
View = Allows users to view but not make any changes to the Hyperlinks page in System Management. Change = Allows users to view and make changes within the Hyperlinks page in System Management. |
|
Interest Rates:
Allows a user to view and change Interest Rates in System Management. Interest Rates are used to determine variable rates on charged off accounts. Charged-off accounts are available in the system, but this feature only ties to those accounts if the Recovery module is active.
|
None = Users can not view or access the Interest Rates page in System Management.
View = Allows users to view but not make any changes to the Interest Rates page in System Management. Change = Allows users to view and make changes within the Interest Rates page in System Management. |
|
Letter Barcode Activation:
Allows a user to activate the letter barcode process and define the location where scanned files are to be placed for the institution. |
None = Users can not view or access the Letter Barcode Activation page in System Management > Communication > Letter Barcode Activation.
View = Allows users to view, but not make any changes to the Letter Barcode Activation page in System. Change = Allows users to view and make changes within the Letter Barcode Activation page in System Management. |
|
Letter Barcode Scanning Exceptions:
Allows a user to view exception documents, as well as manually attach the documents to the applicable account or cases. |
None = Users can not view or access the Letter Barcode Scanning Exceptions page in System Management > Communication > Letter Barcode Scanning Exceptions.
View = Allows users to view, but not make any changes to the Letter Barcode Scanning Exceptions page in System. Change = Allows users to view and make changes within the Letter Barcode Scanning Exceptions page in System Management. |
|
Letters and Forms:
Allows a user to create letters and other forms to be used when working a case within the system.
|
None = Users can not view or access the Letters and Forms page in System Management > Communication > Letters and Forms.
View = Allows users to view but not make any changes to the Letters and Forms page in System Management > Communication > Letters and Forms. Change = Allows users to view and make changes within the Letters and Forms page in System Management > Communication > Letters and Forms. |
|
Merge Accounts:
Allows a user to merge two accounts together. This action cannot be undone, therefore, caution should be taken when using the merge function. |
None = Users can not view or access the Merge Accounts page in System Management.
Change = Users can view and access the Merge Accounts page, as well as perform the Merge function. |
|
Payment Types:
Allows a user to manage the values that appear within the Payment Method drop-down in the Promise to Pay Workflow Step. |
None = Users can not view or access the Payment Types page in System Management > Payment Types.
View = Allows users to view but not make any changes to the Payment Types page in System Management > Payment Types. Change = Allows users to view and make changes within the Payment Types page in System Management > Payment Types. |
|
Performance Groups:
Allows a user to view and change performance groups in System Management. The Performance Groups page allows administrators to group users together who have similar capabilities. Data regarding their calls, contacts and promises are calculated and tracked on an individual user basis and as a whole Performance Group. |
None = Users can not view or access the Performance Groups page in System Management > Groups > Performance Groups.
View = Allows users to view but not make any changes to the Performance Groups page in System Management > Groups > Performance Groups. Change = Allows users to view and make changes within the Performance Groups page in System Management > Groups > Performance Groups. |
|
Role Types:
Allows a user to view and change Role Types in System Management. |
None = Users can not view or access the Role Types page in System Management.
View = Allows users to view but not make any changes to the Role Types page in System Management. Change = Allows users to view and make changes within the Role Types page in System Management. |
|
Screens:
Allows a user to view and change screens in System Management. There are three categories of screens within the Lifecycle Management Suite: System-Defined, Custom and User-Defined. System-Defined screens are pre-built by Temenos to provide out-of-the-box functionality and do not require (or allow) any configuration. Custom screens are coded by the customer or by Temenos on behalf of the customer and installed on the customer’s site. A User-Defined screen is created by the customer within Screens. |
None = Users can not view or access the Screens page in System Management.
View = Allows users to view but not make any changes to the Screens page in System Management. Change = Allows users to view and make changes within the Screens page in System Management. |
|
Security Groups:
Allows a user to view and change Security Groups in System Management. Security Groups are designed so that managers can set Temenos Lifecycle Management Suite access for a group rather than every individual user.
|
None = Users can not view or access the Security Groups page in System Management > Groups > Security Groups.
View = Allows users to view but not make any changes to the Security Groups page in System Management > Groups > Security Groups. Change = Allows users to view and make changes within the Security Groups page in System Management > Groups > Security Groups. |
|
Share Types:
Allows a user to view and create various share types in System Management.
|
None = Users can not view or access the Share Types page in System Management.
View = Allows users to view but not make any changes to the Share Types page in System Management. Change = Allows users to view and make changes within the Share Types page in System Management. |
|
Third Party Duplicates:
Allows a user to merge and export Third Party Duplicates in System Management. The Third Party Duplicates page displays any accounts imported from a third party that match multiple accounts with the same Third Party ID. |
None = Users can not view or access the Third Party Duplicates page in System Management
View = Allows users to view but not make any changes to the Third Party Duplicates page in System Management. Change = Allows users to view and make changes within the Third Party Duplicates page in System Management. |
|
Third Party Exceptions:
Allows a user to review and resolve third party exceptions so that all third party accounts can be imported into the system. Typical third party accounts include PSCU, FICS, Certegy,and more. |
None = Users can not view or access the Third Party Exceptions page in System Management. View = Allows users to view and perform functions within the Third Party Duplicates page in System Management. |
|
Third Party Field Audit:
Allows a user to track account-level changes submitted by third party companies. |
None = Users can not view or access the Third Party Field Audit page in System Management.
View = Allows users to view but not make any changes to the Third Party Field Audit page in System Management. Change = Allows users to view and make changes within the Third Party Field Audit page in System Management. |
|
Third Party Internal Transfer Request:
Allows a user to view and edit third party transfer requests.
|
None = Users can not view or access the Third Party Transfer Request page in System Management.
View = Allows users to view but not make any changes to the Third Party Transfer Request page in System Management. Change = Allows users to view and make changes within the Third Party Transfer Request page in System Management. |
|
Transaction Codes (Recovery Module):
Allows a user to track payments, adjustments, and expenses on charged off accounts. Multiple transaction codes can be configured to apply funds differently to an account. |
None = Users can not view or access the Transaction Codes page in System Management.
View = Allows users to view but not make any changes to the Transaction Codes page in System Management. Change = Allows users to view and make changes within the Transaction Codes page in System Management. |
|
Users:
Allows a user to view and change existing users within the system, as well as create new users. |
None = Users can not view or access the Users page in System Management.
View = Allows users to view but not make any changes to the Users page in System Management. Change = Allows users to view and make changes within the Users page in System Management. |
|
Workday Schedules:
Allows a user to define the expected duration when working an account, due dates, holidays and more. |
None = Users can not view or access the Workday Schedules page in System Management.
View = Allows users to view but not make any changes to the Workday Schedules page in System Management. Change = Allows users to view and make changes within the Workday Schedules page in System Management. |
|
Workflow:
Allows a user to view and change workflows in System Management. Workflows are used to document what occurs within an account or case and can be configured to be as basic or as complex as the creator desires. |
None = Users can not view or access any features in the Workflow folder in System Management.
View = Allows users to view but not make any changes to any of the features in the Workflow folder in System Management. Change = Allows users to view and make changes to any features in the Workflow Folder in System Management. |
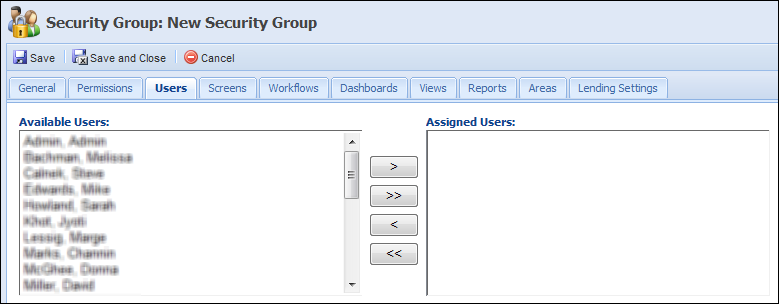
Within the Users tab, assign active users within the Lifecycle Management Suite to be a part of the Security Group.
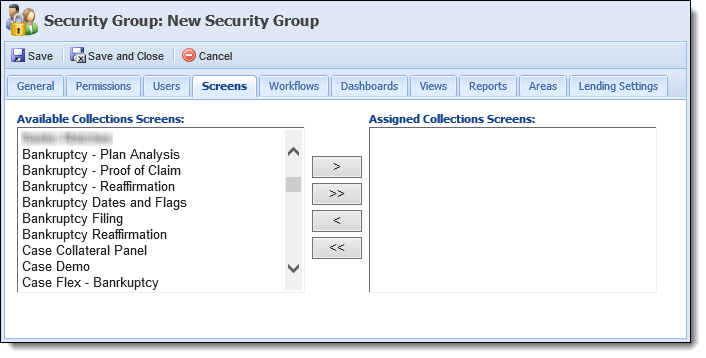
Within the Screens tab, assign available screens to the Security Group. If a screen is assigned, the users in the Security Group have access to the screen in the workspace.
|
If the security group the user is assigned to has access to the screen, by default the user has access to the screen, even if they do not at the user level. |
|
The screens and boxes that display on the Security Group Edit screen are determined by the enabled module. For example, if loan origination is not active, lending screens are not available to be assigned and the Available and Assigned Lending boxes do not display on the Screens tab. |
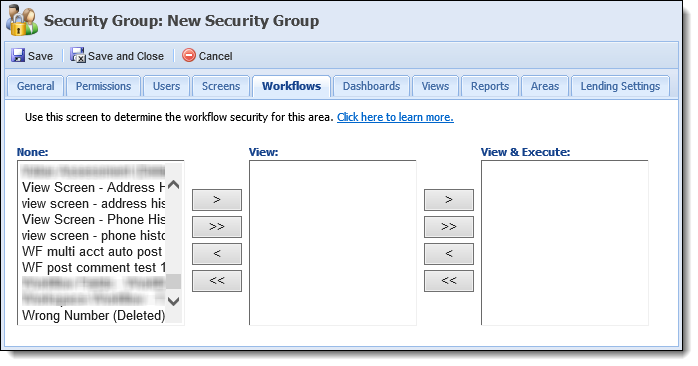
Workflows can be assigned in the Workflow tab. There are three levels of access a security group can have on a workflow: None, View, or View & Execute.
|
If the security group the user is assigned to has access to the workflow, then by default the user has access to the workflow even if they do not have permission at the user level. |
In order for a user to have access to a workflow in an Area, the following criteria must be met:
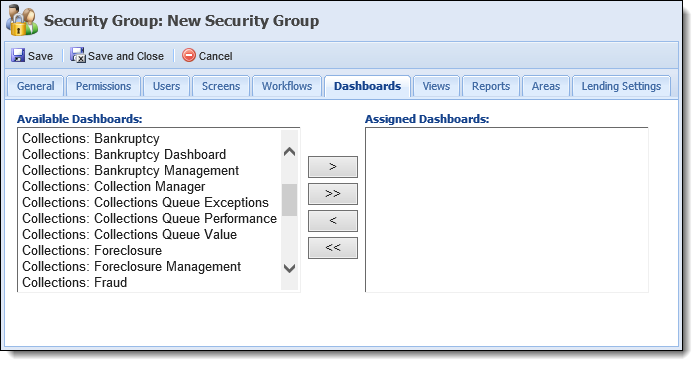
On the Dashboards tab, assign available dashboards to the Security Group. If assigned, the user is able to open the dashboard from the dashboard icon in the Lifecycle Management Suite ribbon.
|
If a user has individual permission to a dashboard, by default the user has access to the dashboard even if they do not at the Security Group level. |
On the Views tab, assign available views to the user. If assigned, the user is able to open the view from the views icon in the Lifecycle Management Suite ribbon.

|
If a user has individual permission to a view, by default the user has access to the view even if they do not at the Security Group level. |
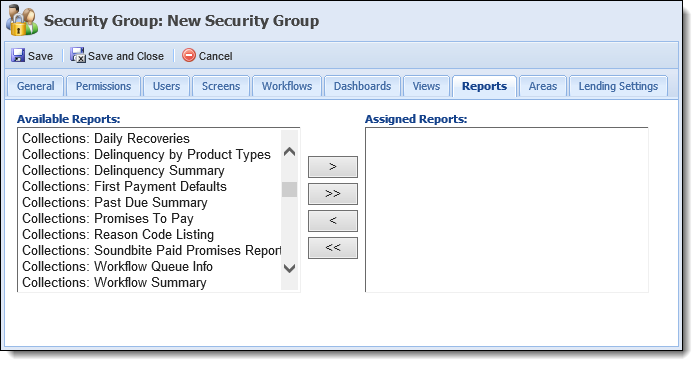
On the Reports tab, assign available reports to the Security Group. If assigned, the Security Group has the ability to view/run the reports from the reports icon in the Lifecycle Management Suite ribbon.
|
If a user has individual permission to a Report, by default the user has access to the view even if they do not at the Security Group level. |
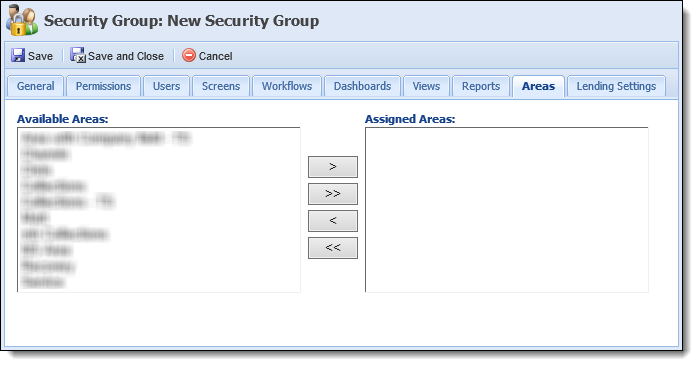
On the Areas tab, assign available areas to the Security Group. These assigned areas are available to the Security Group in the Areas drop-down in the Person workspace.
|
If a user has individual permission to an area, by default, the user has access to the area even if they do not have permission at the Security Group level. |
Lending Settings enables administrators to assign Application Sources and Restricted Account Types to a Security Group.
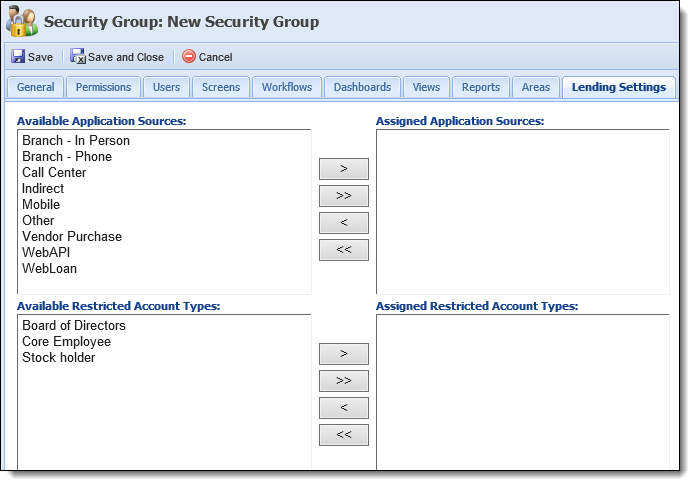
At the top of the Lending Settings tab, a multi-grid containing the following tables control which application sources users within the security group are able to process applications for:
| Table | Description |
| Available Application Sources | Contains a list of all the application sources that have not been assigned to the security group. Upon assigning an application source the security group, it is removed from the available list. |
| Assigned Application Sources | Contains a list of all application sources that have been assigned to the security group. |
Use the multi-grid controls to assign or unassign the desired application sources.
At the bottom of the Lending Settings tab, a multi-grid containing the following tables control which restricted account types users within the security group are able to process applications for:
| Table | Description |
| Available Restricted Account Type | Contains a list of all the restricted account types that have not been assigned to the security group. Upon assigning a restricted account type the security group, it is removed from the available list. |
| Assigned Restricted Account Type | Contains a list of all restricted account types that have been assigned to the security group. |
Use the multi-grid controls to assign or unassign the desired restricted account types.
When finished navigating through all of the tabs and entering in information, click Save or Save and Close to save the new Security Group and return to the Security Groups page. The new Security Group populates in the Security Groups page and can now be assigned to features throughout the Lifecycle Management Suite. Click Cancel to return without saving.
 .
. to retain the new Security Group and return to the Security Groups page. The new Security Group populates in the Security Groups page and can now be assigned to features throughout the Lifecycle Management Suite. to retain the new Security Group and return to the Security Groups page. The new Security Group populates in the Security Groups page and can now be assigned to features throughout the Lifecycle Management Suite.
 . The Edit Security Group screen appears. to retain the Security Group and return to the Security Groups page.
 .
. Permissions
 icon for a masked field, a tool-tip is presented to the user to identify that permission to unmask the field is not enabled
 is disabled in the Ribbon Bar.
